Tuesday, October 8, 2013

Pallet Wood Antiqued Wooden Home Sign

Unfinished wooden pallet boards before aging process

First step process effects (tea)

2nd step vinegar & steel wool solution

Frame from the same pallet

After about 30 minutes

Finished sign (actually I went back and added a decal to the bottom left for an added touch)
Good Morning to you all!! Welcome back to ReDo Me! Today I decided to share the project I did for an upcoming silent auction for our local American Legion. I got the idea from a project posted on www.Hometalk.com . This project took about three days to finish in total due to my hectic work schedule and home life. I have a preteen and hubby, and you know how that can get LOL!
Any who, back to the task at hand. I got the pallet wood from a friend who found them at the local newspaper. I had originally wanted full pallets but I wasn't about to turn down free untouched wood!!! These were only partial pallets. The night before I started my project, I got out the steel wool and tore it up a bit and put it in a coffee can. Next I poured the vinegar over the steel wool and put the lid on and left it alone. The vinegar and steel wool takes 24 hours to work its magic.
When I felt the solution was ready to work with I set out to get down to the basement and get to work. I had been itching to get this project started and couldn't wait to start. I picked out a frame and three boards that would fit nicely into the frame. I didn't want them to fit snugly into place because I wanted it to look more like an old fence or old barn wood. I brushed the tea on with a small paint brush that I had picked up for $1.00 at the local Walmart. I didn't need anything fancy for this project so I went with the good ole cheapy. As you can see from the pictures posted above, the tea made a nice stain effect bringing the color out in the wood. I was almost tempted to stop there because I liked the color!!
I waited about 30 minutes for the tea to soak into the wood nicely, then followed up with the vinegar solution. I brushed it right on top of the tea and stepped back and waited to see what would happen. Within 30 more minutes you could started to see the aging process start!! I was fascinated watching this nice new piece of wood age before my eyes! I wanted to make sure the process took, so I did a second coat of both tea and vinegar for good measure.
I left the wood to dry over night and when I came back I had beautiful aged wood boards to work with. The next step was to cut the frame down to the right size. Easily enough done by cutting it in half. The only problem is that I don't have a power saw. I had to use a had saw. I had forgotten how labor intensive this could be seeing as I hadn't used the hand saw since 8th grade shop class and that was many, many, many years ago!! But I work with what I have, and having to use manual tools just made the whole thing more satisfying since, I really had to work for this project. I can literally say blood and sweat went into this one (no tears here except maybe ones of joy when it sells and the proceeds go to a good cause).
Next, I nailed the boards into place, yes with a real hammer, not a nail gun, once again manual labor the whole nine yards here. However, I didn't take the traditional route with the placement and making the nails uniform. I nailed them here and there along the wood enough so that the boards were firmly in place. Again, I repeat I did this for the rustic look, not because I don't know how to properly nail boards in place. Every detail in a project not matter how minor it maybe, is important!!
After the sign was pieced together and I had the look I wanted. I placed some decals on that had a much nicer saying... HOWEVER, the decals refused to stay in place. I was immediately frustrated. So I decided that it would be best to just break out the stencils and paint at least one saying onto the wood planks. The paint dried pretty quick. Next step, I got out my little hand sander and went over the top of the entire project with a fine 120 grit sand paper. This step aged out the black paint and gave me a nice smooth finish on the sign.
 I was pleased with the way the sign had come out but I felt that something was still missing.
I went to a site called Thegraphicsfairy.com and found a nice little graphic that would fit perfectly in the bottom left hand corner:
wreath
To get this onto the wood, I printed the graphic off on some wax paper. I had to wet the wood a little bit to get the graphic to be a little darker on the wood. I transferred it to the wood by placing the fresh printed page directly to the wood and held it firmly in place then used a spoon to rub the ink into the wood. There was no need to distress the decal because it already had the aged look once it was on the wood.
I unfortunately forgot to get a picture of this as I needed to get it to the Legion quickly for the auction.
This project in total only cost me, about $10.00. I will update you all later as to how much the sign was auctioned off for. I hope you like this project and please feel free to leave comments below!!
Happy Tuesday!!
Angel...

Friday, October 4, 2013

Plain White Shabby Mirror to Silver Antiqued Fabby Mirror

Before: Plain white mirror

After: Silver antiqued floral mirror

Bottom section 

Hi Ya'll!!! Here's my version of Shabby to Fabby!!
This is just a plain white hanging closet mirror I got for my daughters bedroom 2 years ago. I decided it need a make over and set my creative mind to work on it....

Materials needed: Mirror
                             Silver metallic spray paint
                               Glue gun and glue sticks
                                 Silk flowers of any type
                                   Tape and old paper to tape off mirror
1. Tape off the mirror section.
2. Glue the flowers including some leaves into any pattern or position you desire. I usually let the project "speak" to me so to say and just place the arrangement where ever I feel it needs to go.
3. Once you get your design finished go to town with the spray paint making sure to keep the can at least 6 inches away from the project or you may end up with streaks! Let the first coat dry and if you feel it is not covered enough go back over the project once more.

That's it! Let the frame dry then remove the taping. 
Hope you all enjoy this fun project as much as I did. Remember to leave me comments to let me know how this project worked out for you!! 
Happy Creating!!! It's FRIDAY YA"LL!!!!!


Thursday, October 3, 2013

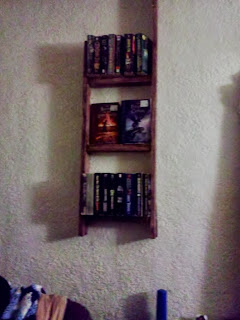
Bunkbed Ladder to Bookshelf Treasure !

 Before
After:

 I had decided about 6 years ago that my daughter was getting to big for the bunk bed that she had in her room. Her older sister needed her own room and own space so there was no use for the bunk bed any longer. I tore it down and decided that I would keep the wood pieces in case I ever wanted to build something new. I mostly use things like this for gardening, but for some reason I just never got around to doing anything with the ladder piece.
I have been on a new creative kick recently upcycling everything in my home, from clothes to furniture and more. I came across the ladder and decided it was time to make use of it. I needed a new bookshelf and had planned on making a couple of wall mounted shelves for my books, however inspiration took over and my old ladder is now the bookshelf mounted to the wall in the bedroom (thank goodness too!! My walls are so bare!). 
This project didn't cost me a dime!!! I already had everything I needed on hand. This is how I made this piece.

1. I sanded down the wood just enough to get that roughened up look. I hate trying to strip varnish so I didn't bother with it this time.

2. Next I got out the off white paint that was left over from other projects and went to town painting over the scuffed up ladder. I used a cheap .97 cent paint brush that has ruff bristles. Now anyone who has ever used paint to paint walls or virtually anything, knows that the first coat of paint ALWAYS has streaks in it. I liked the streaks and left them. This step would save me hours of sanding through to get the weathered look I was going for. 

3. Let it dry. Since it is one coat of paint it won't take too long.(20 minutes maybe depending on how heavy handed you are with the one coat of paint)

4. Sand over again. Take off any heavy white painted areas and scuff up the paint.

5. Using step 2 use the wood stain. For this piece I used what was on hand : Red Mahogany . Remember to follow the exact same steps in number 2 as you do this step. Allow for the stain to dry. This step takes a bit longer but seeing as though there is only the one coat of stain it shouldn't be too long ( maybe 3-4 hours) 

6. Sand over again. This time you are just trying to get the layered scuffy look. The end result looks as though the wood has been weathered and worn.

Now, I wanted my bookshelf to be mounted to my wall so I used extra long nails and nailed through the front of the ladder frame so that the nail tips came through the back. when I put it up to the wall all I had to do was hammer lightly on the nail heads and it drove the shelf right onto the wall!!

That was all it took!! 

The amount of time I spent on this project was about four hours total. I started three other projects while I was waiting for the coats of paint and stain to dry.

Thanks for reading my blog and I hope your all having a great day upcycling!!!
.

Thursday, April 25, 2013

Review: Recipe for Loaded baked Potato Soup


I am not a fan of Potato Soup HOWEVER, I came across this recipe from www.allrecipes.com  for Loaded Baked Potato Soup. My daughter had been bugging me about making Potato Soup for most of the winter and I was trying to dissuade her from asking me to make it. I grew up hating the stuff, (no offense mom) but I found that boiled potatoes with a little milk to be terrible!!! It didn't matter if you added anything to the soup to dress it up. I wanted nothing to do with it.

My daughter was relentless in her pursuit of having me make her Potato Soup though. So I decided to search the world wide web for a decent recipe for the (in my opinion) horrid concoction. The following is a rating system I have come up to rate the recipes we try.

1 star for ease of recipe to make
1 star for how well the recipe went over with the entire family
1 star for cost of ingredients ( the most important star on my rating scale! Let's face it we all like things that are inexpensive, and in my home, I watch every penny I can).

www.allrecipes.comThis recipe receives a 2.5 stars! It is a bit expensive to make however, for the money you spend you end up with quite a bit of left overs depending on how large your family is or if you cut the recipe in half.

Below is the direct link to the recipe. Give it try you may like it!


http://allrecipes.com/Recipe-Tools/Print/Recipe.aspx?recipeID=25665&origin=detail&servings=12&metric=false


Saturday, April 13, 2013

Wrinkle


Weather worn and time beaten
Indebted to Mother Nature’s curse.
You come forth.
In your deepest hidden valleys lie the tears and laughter of so many memories.
Some of which have been forgotten.
You come forth.
Like so many others before
That fought the creeping dawning.
You come forth.
Worn as a badge of Honor
You come forth.

Poem by Angel Ernst**

Friday, April 12, 2013

Completely Creeped out!

http://news.yahoo.com/video/millions-wasps-discovered-gigantic-21-210840472.html

Ok I had to share this. I am no fan of stingy flying insects and this is one reason why.....

Fable Haven Series by Brandon Mull Review

Fablehaven- My all time favorite book series! I have read this series close to 100 times over. I can not get enough of this book series. Each time I read this I am swept away into a magical place where my imagination can run free I can be young again.
The plot (book one) is about two young siblings who are forced to stay with their grandparents who they barely know; after their other more familiar grandparents were killed in an accident and their parents go on a family trip that do not allow the children to come along. While they are with their grandparents Kendra (main character) finds a secret journal that is completely blank except with one sentence written in the crease of the book, "Drink the Milk". There are strict rules  at Fablehaven set by Grandpa Sorensen. One of which is stay out of the woods and the barn no matter what. Seth ( other main character) has trouble following the rules due to his sense of adventure and his young age. The one peculiar thing about Fablehaven is that there an abundance of flowers, and butterflies and dragon flies.
 One day Seth sets off into the woods to for an adventure being as he is a restless young boy who can't stand to abide by the strict rules set forth by his grandfather. While there, he runs across an old woman who is chained to a stump living in a shack. After a frightening run in with her he leaves quickly and returns to the manor. Of course he gets into trouble over the escapade. Kendra sets out to unravel the mystery of the one sentence in the blank journal and soon finds a way to get her younger brother to test the milk that Dale the handy man had been setting out for the insects and claims is full of toxins that the kids should not be drinking. Seth tries the milk and immediately begins to see the truth behind Fablehaven! The insects are not what they appear to be they are actually Fairies!!
 The truth is out and Grandpa Sorensen is relieved that the children have followed his clues and stumbled into the world he and his wife have been overseeing. He admits that he had been searching for replacements for him and his wife and that the rest of the family were not qualified for the job. Fablehaven is a dangerous place with dangerous creatures that could and will kill with out hesitation. There's also the threat of the group called the "Evening Star" a group that wants to free all demons from their prison and all magical creatures from the confines of refuges such as Fablehaven. Soon the race is on to protect the world from the Evening Star!

Through out the series Kendra and Seth fight against the Evening Star to save the world from the rule of Demon Kind. The series has a multitude of twists and turns that will keep you on the edge of your seat the entire time you read. The characters are hard not to get attached to. If you love anything magical you will absolutely love Fablehaven seeing it has every type of magical creature in the series. Plenty of action suspense and thrills are packed into this one series. Readers will keep coming back for more time and time again.
 There are 5 books in the series and each one is as good as the next!
Book one is Fablehaven
Book two is Fablehaven: Rise of the Evening Star
Book three is Fablehaven : Grip of the Shadow Plague
Book four is : Fablehaven : Secret of the Dragon Sanctuary
Book five is : Fablehaven: Keys to the Demon Prison

If you loved Harry Potter then you will most assuredly love the Fablehaven series by Brandon Mull!!!


Beautiful Creatures the Book

I had the pleasure of reading "Beautiful Creatures" by Garcia-Stohl published by Little, Brown and Company 2009, just these last few days while I was laid up in my bed sick.
I must admit that I was only mildly impressed with this book. The plot is about two teenagers who are drawn together by unexplained forces with the young boy being the hero to the maiden who is doomed.--- Okay, we all have to admit this is very cliche, but does this book make it any different? No.

The book is well written. The jacket cover even says on the back label , "Give this to the fans of Stephanie Meyer's Twilight or HBO's True Blood series."-SLJ... so what does this tell me? It really is not original. In fact I have read several books that are the exact same genre , teen romance that involve witches, or werewolves and vampires. However, I will not deny that the book did keep me entertained and I did not want to put it down until I was finished reading to the end.

The movie is set to be released on DVD May 13th 2013. I can't wait to see it. ( I don't really ever go to the movie theater because I would rather see a good movie at home where it is quiet and I can pause the movie if I need to get up and get refreshments). The previews looked wonderfully creative and I admit, I look forward to comparing the book to the movie. Usually movies never come close to the books, but this time I may be wrong.

** Again this is just my own personal review, and I have no connections what so ever to the authors or publishing company listed in this review. this is my my opinion only.** Feel free to leave comments.


Sunday, April 7, 2013

Spring Has Finally Sprung !!

It's FINALLY here!! Jump for joy and shake off the winter blues.... Spring is here. With the weather warming up rapidly I plan to start taking to the outdoors. I have already started planting seedlings in doors and watch them tentatively with my daughter. This year we are trying something new. We decided that we would try to grow a small strawberry patch. If all things go well in a few weeks we should be seeing the first signs of strawberry sprouts.

I have decided to try to follow in Ms. Kay's (Duck Dynasty) lead and try my hand at making preserves as well this year. This should be somewhat comical and I will be making sure to include videos and pictures of the what's sure to be disastrous adventures here!! Maybe I should buy her cooking videos???